I have always wanted a homelab. I’ve tried multiple times to maintain one. Once I get a lab setup I often abandon it. I have more fun figuring out how to construct the lab then using it. This has included multiple servers, NUCs, Raspberry Pis, and even a full VMWare vSphere setup.
I have often wished I could scale my lab using the cloud. I realize I could have always done this if I tried hard enough, but that sounds like work (time and money). It needs to be a simple solution that I can spin up and down since I go weeks (or months) without touching side projects.
Enter Tailscale. Tailscale is a product built on top of Wireguard that allows you to build a vpn mesh through point-to-point encryption (I think I used all those words correctly). This means that you can connect a bunch of computers together and create your own private internet, no matter where those devices are located. It is really simple to get working and in this post, I will show you how I am scaling my homelab into the cloud using Tailscale, DigitalOcean, cloudinit and Terraform!
Skip the words and get the code here (Its only 2 files)
Prerequisites
There are a few prerequisites to this tutorial.
- Setup DigitalOcean Account
- Setup Tailscale Account
- Install Terraform.
Set Up
Before starting, we need to acquire some keys! First, get a reusable key from Tailscale admin portal and from your terminal, set it in your environment:
export TF_VAR_tailscale_key=<token>
Next, get a token for your DigitalOcean account here and set in your environment:
export DIGITALOCEAN_TOKEN=<token>
Then, setup a simple project structure
PROJ_DIR=$HOME/code/tailscale-lab
mkdir -p ${PROJ_DIR} && cd ${PROJ_DIR} && git init && touch main.tf
Terraform
Let’s make some computers! Let’s add the DigitalOcean provider to a main.tf file located in your project directory. In Terraform, this is how we declare dependencies.
terraform {
  required_providers {
    digitalocean = {
      source = "digitalocean/digitalocean"
    }
  }
}

provider "digitalocean" {
}
We know that we are going to need our Tailscale key, so let’s add that as a required variable to the main.tf file. We will get to how to use it later.
variable "tailscale_key" {
  type = "string"
}
Next, I will declare a private network for my lab, you can set this network range to whatever you want. Don’t think too hard on this, Tailscale is going to handle the networking we need to talk to our computers.
resource "digitalocean_vpc" "homelab" {
  name     = "homelab"
  region   = "nyc3"
  ip_range = "10.10.10.0/24"
}
This step is where the magic happens! First, I will load my ssh key from disk and create a lab key in DigitalOcean. Next, I am creating an Ubuntu 20.04 Droplet and adding the SSH key to this. This will allow us to immediately get access to the host when its booted using SSH.
resource "digitalocean_ssh_key" "default" {
  name       = "Labscale - Terraform"
  public_key = file("~/.ssh/id_rsa.pub")
}

resource "digitalocean_droplet" "server" {
  count     = 3
  name      = "server-${count.index}"
  size      = "s-1vcpu-1gb"
  image     = "ubuntu-20-04-x64"
  region    = digitalocean_vpc.homelab.region
  vpc_uuid  = digitalocean_vpc.homelab.id
  ssh_keys  = [digitalocean_ssh_key.default.fingerprint]
}
Next lets add our resources to a project (just to stay organized) and we want to print some informaton about our new hosts
resource "digitalocean_project" "labscale" {
  name        = "labscale"
  description = "A project for scaling homelab with tailscale"
  resources   = digitalocean_droplet.server.*.urn
}

output "public_ip" {
  value = digitalocean_droplet.server.*.ipv4_address
}

output "private_ip" {
  value = digitalocean_droplet.server.*.ipv4_address_private
}
That’s it for the initial setup! If you run terraform apply, it will create some servers inside of a private network, but those servers won’t be configured to do anything yet. For that, we are going to use cloud-init!
Cloudinit
One of my favorite patterns is using cloud-init to get simple bootstrapping steps done (sometimes thats all you need). It prevents the complexities of adding Ansible, Puppet or Chef to your project until they are needed. Some light bash scripting can take you a long way.
If you haven’t heard of cloud-init, you should go read about it. The project description sums it up well:
Cloud-init is the industry standard multi-distribution method for cross-platform cloud instance initialization. It is supported across all major public cloud providers, provisioning systems for private cloud infrastructure, and bare-metal installations.
This is a very lightweight layer to abstract away the underlying provider and can help simplify other layers in the provisioning process in my experience.
When you use cloud-init you inject it as user-data at provisioning time. It can be simple bash scripts or it can be a complex combination of many file types. The project has also prescribed its own file format. Its a YAML file that begins with a specific comment that is interepted by cloud-init:
#cloud-config
---
That’s it. This file doesn’t do anything but we can add many configuration options to this. Go read more here to see some great examples to learn from.
Adding Userdata
Okay, so we learned some about cloud-init but now lets use it to give our blank droplet a purpose. To accomplish this, I will use Terraform’s templatefile function. This allows us to load a Go template and inject variables into it. When paired with the user_data field, this becomes a very simple configuration engine.
So let’s create a template called userdata.tpl.
touch userdata.tpl
In that template, let’s add our #cloud-config declaration as well as add the Tailscale Debian repository.
#cloud-config
---
apt:
  sources:
    tailscale.list:
      source: deb https://pkgs.tailscale.com/stable/ubuntu focal main
      keyid: 2596A99EAAB33821893C0A79458CA832957F5868
That’s a great start. Next we want to tell the system to install tailscale on boot, so we can add the packages module:
#cloud-config
---
apt:
  sources:
    tailscale.list:
      source: deb https://pkgs.tailscale.com/stable/ubuntu focal main
      keyid: 2596A99EAAB33821893C0A79458CA832957F5868
+packages:
+  - tailscale
This will then install the tailscaled agent and start it using systemd. Finally, we want to run the command to join the computer to our Tailscale account. We can use the rumcmd module which runs abitrary shell commands:
#cloud-config
---
apt:
  sources:
    tailscale.list:
      source: deb https://pkgs.tailscale.com/stable/ubuntu focal main
      keyid: 2596A99EAAB33821893C0A79458CA832957F5868
packages:
  - tailscale
+runcmd:
+  - [tailscale, up, -authkey, ${tailscale_key}]
Notice I have added ${tailscale_key}. The ${ ... } defines a variable that the Terraform templatefile method parses. So I have declared a variable is needed named tailscale_key. Next, we want to load this template into the user_data field of the droplet and pass in the Terraform variable we declared earlier:
resource "digitalocean_droplet" "server" {
  count     = 3
  name      = "server-${count.index}"
  size      = "s-1vcpu-1gb"
  image     = "ubuntu-20-04-x64"
  region    = digitalocean_vpc.homelab.region
  vpc_uuid  = digitalocean_vpc.homelab.id
  ssh_keys  = [digitalocean_ssh_key.default.fingerprint]
+ user_data = templatefile("${path.module}/userdata.tpl", {
+   tailscale_key = var.tailscale_key
+ })
}
This is how our hosts come to life! On startup cloud-init will see this template completely hydrated and run this to bootstrap our hosts.
Deploy
Now let’s put this all together and deploy some servers
terraform plan -out tailscale.out
terraform apply tailscale.out
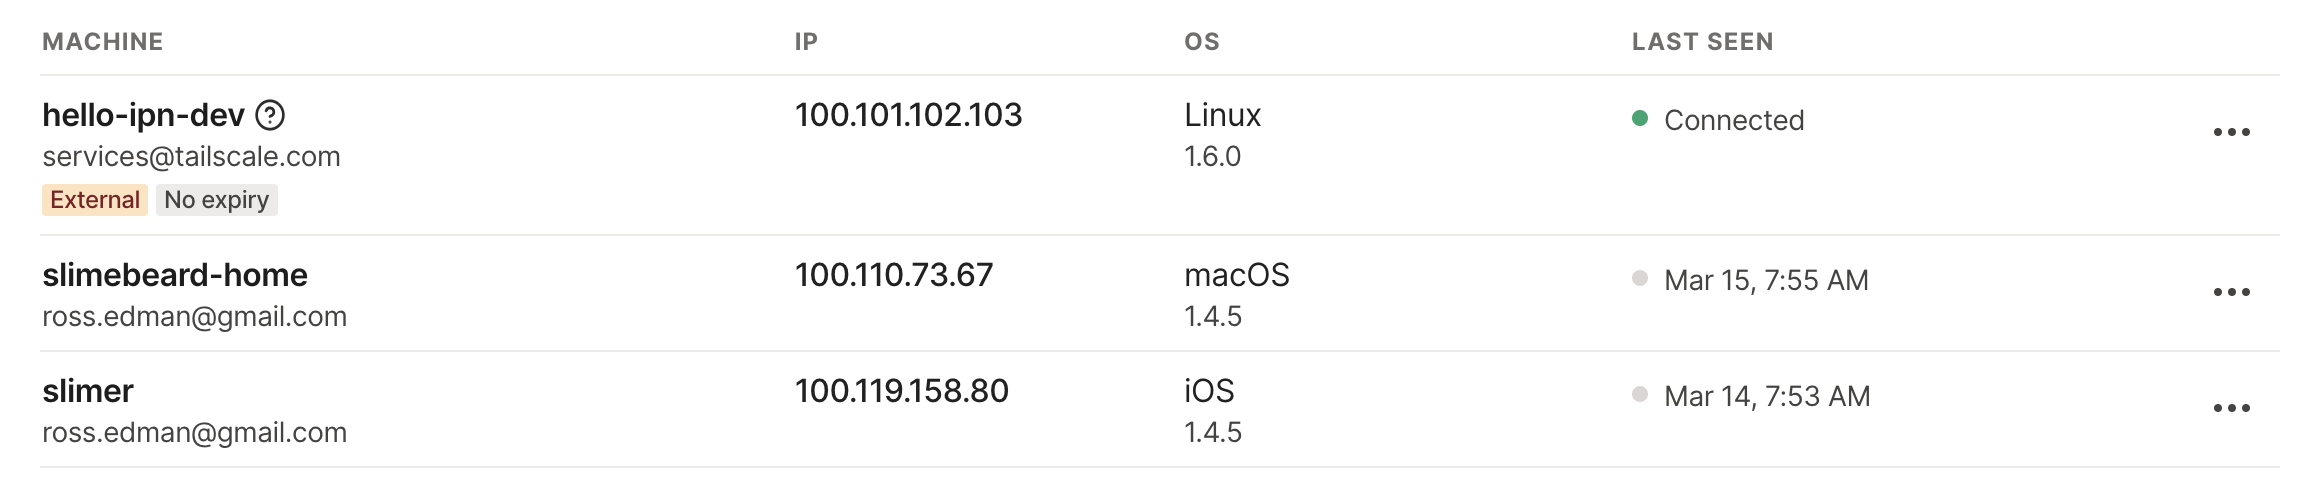
Here is a screen shot of my Tailscale account beforehand. The important thing of note is that my phone and laptop are connected to Tailscale already, but nothing else.
Once this has run you should see output like this
Apply complete! Resources: 2 added, 1 changed, 0 destroyed.

Outputs:

private_ip = [
  "10.20.10.2",
  "10.20.10.4",
  "10.20.10.3",
]
public_ip = [
  "64.225.2.242",
  "174.138.63.91",
  "167.71.163.136",
]
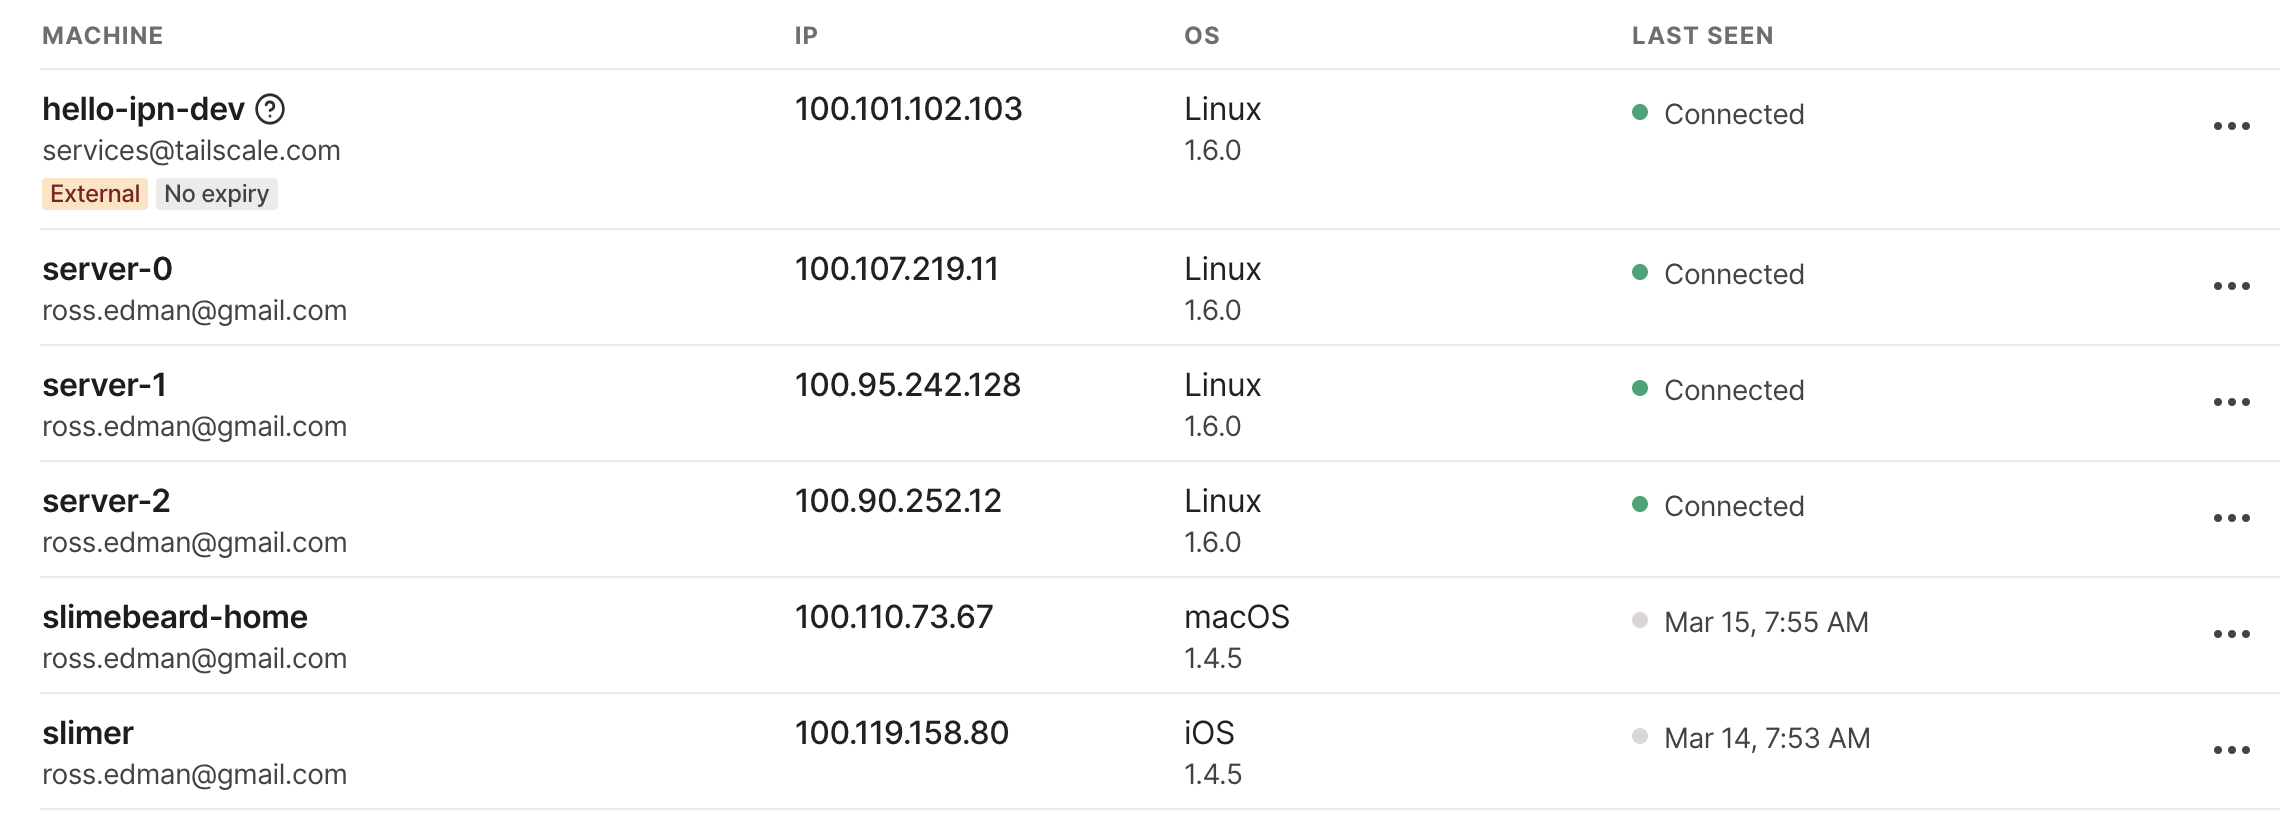
From here, if we login to Tailscale we should see our servers have joined (sometimes it takes a minute)!
Accessing
Great! Now we hae some servers. Let’s try accessing them. First I try accessing from the public ip address printed above. This is a great way to ensure nothing else is wrong.
➜  base git:(main) ✗ ssh root@64.225.2.242

Welcome to Ubuntu 20.04.1 LTS (GNU/Linux 5.4.0-51-generic x86_64)

 * Documentation:  https://help.ubuntu.com
 * Management:     https://landscape.canonical.com
 * Support:        https://ubuntu.com/advantage

  System information as of Wed Mar 17 01:57:51 UTC 2021

  System load:                 0.04
  Usage of /:                  8.0% of 24.06GB
  Memory usage:                27%
  Swap usage:                  0%
  Processes:                   105
  Users logged in:             0
  IPv4 address for docker0:    172.17.0.1
  IPv4 address for eth0:       64.225.2.242
  IPv4 address for eth0:       10.17.0.5
  IPv4 address for eth1:       10.20.10.2
  IPv4 address for tailscale0: 100.107.219.11
  IPv6 address for tailscale0: fd7a:115c:a1e0:ab12:4843:cd96:626b:db0b
Great! That means its working (also of note, this isn’t very secure). Now if we use the IP from the Tailscale dashboard we should be able to access these hosts from our private network:
ssh root@100.107.219.11
Once again it works! Now let’s try the Tailscale DNS entry
ssh root@server-0.your.account.beta.tailscale.net
It worked for a third time! How cool is that? Now, one last test! From server-0 (or any of them) run:
apt-get install -y nginx
Once that finishes install open server-0.your.account.beta.tailscale.net in your browser and you should see the Welcome to nginx! page. If you have the Tailscale app on iOS, you can also try to go to this URL from the browser in your phone! Amazing, right?
Summary
In just a short period of time we joined 3 servers to our network and were able to query them from our computer using Tailscale. Overall I am impressed with how much I can do with so few lines of code to expand my homelab!
The code for this is stored in a gist here. There is also an example of how to install Docker & Tailscale if you really want to party. From here, I would block public internet access, add some applications on these servers and have fun. Thanks for reading this, don’t forget to clean up your mess.
terraform destroy
Also if you want to keep the network and the ssh key and just destroy the servers you can run
terraform destroy \
  -target 'digitalocean_droplet.server[0]' \
  -target 'digitalocean_droplet.server[1]' \
  -target 'digitalocean_droplet.server[2]' .